New Feature: Search Engine Compatibilty
July 6, 2009
ingage Publication 4.6.1, featuring search engine compatibility, is now available.
The latest release of our Premium page turning publication software allows search engines such as Google, Yahoo or Bing to search our clients’ publications. Within their respective search results, search engines can display deep, direct links to pages within an ingage client’s document.
Deep linking
When an ingage Publication client’s document shows up in the search results of some search engine’s keyword search, it’s likely that the matching keywords were found not on the first page of the document, but on some page within the document. ingage Publication allows search engines to display “deep links” or links directly to the relevant pages of a publication. When a search result is returned for an article on page 8 of a magazine, the link displayed by the search engine leads the user directly to page 8 of the ingage Publication. From there the user may flip pages, browse or share the publication just as he or she would if starting from the front cover.
Search engine optimization
When it comes to search engine optimization, sometimes it’s the little details that count. At ingage when we convert a client’s PDF file to our Premium Publication format, we work hard to ensure potential publication readers have the best chance to find our client’s publication. That means paying attention to the seemingly small details like displaying the title of the client’s magazine, newsletter or product catalog in the browser window’s title bar so the search engines’ crawlers know how important those keywords are. If a search engine crawler reads a page that is an important article within the publication it sees the title of the article as the title of the page and should weight those keywords accordingly.
Advertiser benefits
When a featured web link is added to an ingage Publication (by the client via link drawing in the PDF using Adobe Acrobat or by ingage at the client’s request) that link is made visible to search engine crawlers. Many search engines, most notably Google, use the number of links (from pages with related content) pointing to a website as a strong indicator of that site’s relevance. The more relevant a site is to a specific set of keywords, the higher it ranks in the search results. It is therefore highly desirable for any website owner to have as many related links pointing to his or her website as possible, primarily for the traffic from clicks on the link, but also for the search ranking benefits.
Many ingage Publication clients produce magazines or guide books containing advertisements for related goods and services. The search engine visible link is sure to be a nice value-add bonus for those advertisers choosing to advertise in our client’s publication.
For more information on ingage or ingage Publication visit http://www.ingagepublication.com or call us at 866.683.2100.
Share and Share Alike
March 25, 2009
ingage Publication users can share publication content using their favorite social networking site or by e-mail with just a couple clicks. All web-based ingage Publication conversions have an optional, built-in sharing feature which allows web surfers to quickly post a link to the publication using popular social networking services FaceBook, MySpace, Twitter, StumbleUpon and Delicious.
It’s Easy
The option to share a publication is always available from the ingage Publication toolbar. As a user flips through the pages of a magazine, catalog or brochure and he or she finds something that may be of interest to his or her friends or colleagues, a link to the publication can be shared by clicking the envelope icon located on the toolbar between the page numbers and the printer.

The share publication button is found between the page numbers and the printer icon.
A new window will open with the available share options. From there, the user may fill out the form to send a personalized e-mail or may click on any of the social network icons located below the form to automatically send the information about the publication to the corresponding social networking site.

Clicking the share button on the ingage Publication toolbar will launch the share window
Clicking the FaceBook icon, for example, will send the cover image and a link to current publication to FaceBook and the user will be prompted to login to his or her FaceBook account and approve the post. The link to the publication is now available to anyone in the user’s FaceBook network.
Choose between several social networking tools.
Taking advantage of the viral nature of social networking and the word-of-mouth type referrals by e-mail is a great way for publishers or content producers to expand potential circulation with little or no added expense. The goal in development of ingage Publication’s built in sharing capability is to accommodate the grassroots distribution of publication content by making the process as simple as possible for the end user.
For more information about ingage Publication visit www.ingagepublication.com or call 866-683-2100.
Preparing PDF files for ingage Publication Premium conversion
January 30, 2009
For a lot of our clients, the design files are destined for a printing facility to have physical, hard-copy magazines or brochures produced, as well as the digital, ingage Publication version. More often than not, our clients send us the very same PDF files they send to their printer with few or no modifications, which makes it easy to add ingage Publication Premium to any project or campaign using printed collateral. Before you transfer your PDF files over to ingage, follow this short checklist of file input requirements to ensure a high-quality and accurate publication conversion.
- For ingage Publication Premium, we accept PDF files, though our self-service ingage Publication Basic will accept JPEG or PDF input.
- Most importantly, all fonts should be non-rasterized, non-outlined and embedded in your PDF file. See below for more information.
- We recommend that all bitmap images be 300 dpi, if possible, especially if your ingage Publication will be delivered on CD. For web-based publications, 300 dpi is not absolutely necessary since some compression will be needed to make the download time more accommodating and appropriate for the Internet environment. Even in this case, however, the higher resolution is preferable because we can always compress images that are too large, but we cannot add quality to images which are low resolution from the start.
- PDF pages should be single pages, rather than spreads.
- PDF pages should all be the same size to avoid stretching or distortion.
- We prefer pre-cropped files but will accept files with or without crop marks.
- You may supply us with your PDF pages as individual files or one or more multi-page documents. A self-explanatory page numbering/naming convention is always preferable!
Embedded Fonts
Part of the beauty of the PDF file format is the ability to embed fonts in your document. Embedding a font is advantageous because the text in a PDF file will display on any computer exactly as it displays on your machine. How many times have you sent a Word document to a colleague or opened it on a different computer and noticed that the fonts are not the same as they were on the authoring computer? This happens when the font that you used to compose the document is not installed on the destination machine. PDF avoids this pitfall by allowing fonts to be embedded as subsets within the PDF file. A font subset is a collection consisting only of the characters that are actually used within a PDF. So if you typed out a few pages and didn’t use the pound sign(#) or the pound sign(£), these characters do not need to be retained in the font subset. Subsetting helps keep the file size of a PDF to a minimum while still retaining the ability to display the text correctly. Many programs that output PDF files will automatically embed the fonts in the document, but sometimes it is necessary to explicitly tell the application to embed the fonts. This is often done through a checkbox somewhere in the “export” or “save as” options, however the procedure for this is application specific, so you will need to consult the authoring programs help documentation for more information.
The quick and easy way to ensure your fonts are indeed embedded is to open your PDF file in Adobe Acrobat (Reader and Professional both have this capability) and click “File” choose “Document Properties…” and click on the “Fonts” tab. There you will see a list of all the fonts used in the PDF document. If you have a large PDF file with a lot of different fonts, this box may take a few seconds to populate. The import piece of information obtained from this list can be found right after the name of each font. Embedded fonts and font subsets will be labeled “(Embedded Subset)” or “(Embedded)” directly after the font name. If this label does not appear after the name of a font, the font is not embedded and will probably not appear correctly after ingage Publication conversion.

Look for (Embedded Subset) after the name of the font
On rare occasions a font, due to licensing restrictions, is unable to be embedded within a PDF document. In this situation it is preferable that text using the restricted font be converted to vector outlines. Please note, text that has been converted to outlines or rasterized will not appear in search results and will not be recognized by the ingage smartLinks feature.
Ensuring fonts are embedded in your PDF file is not only important to the reproducibility of the PDF, but is also imperative to the searchability of your publication once it has gone through the ingage Publication Premium conversion process.
Linking
ingage smartLinks will automatically detect and activate most text-based URLs and email addresses within a PDF document. This feature is ideal for directory listings or mentions of web sites and email addresses within body copy or articles. Additionally, many ingage Publication clients elect to provide an extra dimension of interactivity to their publications by including hyperlinks to external websites or e-mail addresses by hot-linking sections of or entire publication pages. The ingage Publication Premium conversion process will recognize and retain links drawn in a PDF file using Adobe Acrobat Professional.
These steps are demonstrated using Adobe Acrobat Professional 7.0 for Windows but should be similar for most versions of Adobe Acrobat Professional (this functionality is not currently available in Adobe Acrobat Reader).
- Open your PDF document with Adobe Acrobat Professional.
- Select the link drawing tool by choosing Tools > Advanced Editing > Link Tool (this may differ in your version of Acrobat Professional)

Use the link tool to add hyperlinks to your PDF file
- Using the link tool, draw a box around the entire area you wish to be linked. Our clients often choose to draw this box around an entire advertisement or page.
- A dialog box will display. The link appearance information will be ignored by the conversion process. Under link action, choose “Open a web page” to link to a URL or email address. Click the “Next” button.

The Link appearance information will be ignored. Choose "Open a web page" from the Link action section.
- Now, type the destination URL. If you wish to link to an e-mail address, be sure to include the text “mailto:” directly preceding the email address (example (do not include the quotation marks): “mailto:info@ingageinteractive.com”). And click “OK.”

Type in the URL of a web page or mailto:someemailaddresshere
- Repeat steps 3-5 for all links within the PDF file.
- Save your PDF file.


ingage Publication Premium also supports links to pages within the publication itself. This can be achieved by following the steps above, but instead of choosing “Open a web page,” choose “Go to a page view” and follow the instructions provided by Acrobat. Please note that zoom and positioning information chosen by this process is not currently supported and will be ignored by the ingage Publication conversion process.
For more information or clarification about submitting your PDF file for ingage Publication Premium conversion, visit our website at http://www.ingagepublication.com or give us a call at 866-683-2100.
in with the new: a tour of ingage Publication 4.6
January 6, 2009
I am posting this the first week after the long holiday break between Christmas and New Year’s Day. Even though the holidays are now over and it’s time to get back to the daily grind, there is no post-holiday drag at ingage HQ this year. 2009 is going to be a great year and we are setting the pace early. We are excited to announce the release of the latest version of our Premium Publication product, ingage Publication 4.6. This version incorporates plenty of user feedback and behind-the-scenes development that will improve performance, quality and usability of ingage Publication. 
Along with a little freshening up of some of the design, the most noticeable change in this version of ingage Publication is the improved, in-focus page-turn. We headed back to the drawing board and came up with a solution for page flipping with sharp, full-resolution pages that minimizes the impact on performance on the end user’s computer versus using lower resolution placeholders during the page-turn.

ingage Publication 4.6 features improved page-turning.
The full-screen, single page, chromeless view mode, maxView has been available in ingage Publication Premium since 4.5.6. The way you enter maxView mode has been improved for usability in ingage Publication 4.6. It’s easy; just hover your mouse over either the left page or right page for 1-2 seconds. The maxView icon will appear in the bottom, outer (left for the left page, right for the right page) corner of your screen. Click the icon and enter maxView mode. maxView is perfect for getting the content of a page front and center, without anything to impede your viewing experience.

Hover your mouse for 1-2 seconds over any page to display the maxView button
We have also added a new quick advance feature. Now you can quickly and easily jump to another page in the publication directly from the main toolbar. While in link mode, (with neither the hand nor the magnifying glass selected) click and drag between the divider bars surrounding the current page number on the toolbar. As you drag left and right between the dividers, a number will appear directly above the toolbar. While this number is displayed, release your mouse and the publication will advance to the page corresponding to this number.

Use the quick advance feature to quickly turn to any page.
Under the hood, we have made several other improvements in version 4.6:
• Faster initial preload and optimized page loading
• Improved support for on-page video and animation
• Improved search performance
• Additional branding opportunities
To see a sample of ingage Publication 4.6 visit www.ingagepublication.com. For more information about converting your paper collateral to the ingage Publication format, visit our website or call 866.683.2100.
Focusing in on blurry pages
August 28, 2008
With all of the digital publication conversion options out there today, it can be difficult to distinguish one product from the next. When we began development on what would become ingage Publication 4.0, we set out to do more than just create a product that would differentiate ourselves from the competition, but also to create a fun, fast, easy and functional experience that all ingage Publication users could enjoy.
Note: The following applies to ingage Publication 4.5.6 or ingage Publication 4.6 with “fast” page load option.
One of many ways to identify an ingage Publication from the plethora of other publications out there is the unique page-flipping functionality we introduced in version 4.0. When you flip from one page to the next you will notice that the publication pages go out of focus, flip, and then come back into focus. So why do we choose to turn pages this way when so many other page-turning publications do something completely
different? There are four major reasons, of which I will go into detail:
- Page Quality
- Load Time
- Usability
- Performance
Page Quality
When we launched ingage Publication 4.0, very few, if any, digital publications on the market displayed full screen. This meant that users would most likely have no choice but to zoom in, in order to read most text. One of our goals for ingage Publication is to make it possible for user to read as much text as possible without having to use the zoom feature. If we could take advantage of the user’s entire screen, maybe, we thought, it would be possible for the page to be large enough that it could be read, in some circumstances, without having to zoom in.
Up to this point we, like all of the other digital publications at this time, were using raster files (jpegs to be precise) for our pages. Before we decided to go full screen, this was no problem, because we controlled the size at which the publication would be displayed. Now all bets were off. The major challenge with going full screen was the pixilation that would occur for users with screens that were uncommon sizes (either smaller or larger than average). When you stretch or zoom in on a raster image, the pixels become quite noticeable. The more you stretch or zoom, the more noticeable they would become. (See the ingage clearText example for an interactive experience.) ingage Publication users on large monitors, or very high screen resolutions would likely receive a very blurry, pixilated, perhaps unreadable experience. Continuing to use rasters was no longer an option.
When Adobe (then Macromedia) released Flash 8, it finally became possible for ingage Publication to stop using raster pages and transition to vector pages instead. Unlike raster images, which use a fixed number of pixels to display image content, vector images use mathematical instructions to tell the computer how to draw the image using lines and curves. Since these lines and curves are not dependent on a fixed number of pixels, they will be crisp and sharp at any size, no matter how far in you zoom. There is a trade-off, however. Since the computer has to constantly perform computations in order to display the vector data, pages with a lot of data (such as text or complex shapes) would cause a great performance burden that would slow all but the best computers to a screeching halt. With the release of Flash 8, and the added bitmap data functionality it provided, specifically (I am about to let the cat out of the bag here) the cacheAsBitmap property, we were finally able to use vector pages to provide ingage Publication users a full-screen, crisp, clear, readable experience. This also meant we could do a standing, real time zoom without having to load an external high-resolution file. Switching to this scheme meant we could trim an average of 30% off the total file size for a typical publication.
The catch
There is always a catch. In this instance the catch is page flipping. The cacheAsBitmap property provides no performance benefits to vector data if the data is being rotated. Without cacheAsBitmap, the computer has to continually process all the instructions to constantly redraw the vector data. Along with doing the work necessary to perform the page turn (full screen, mind you), most, if not all, computers will choke trying to keep up with all the calculations necessary to display a page flip with even a small amount of text. Thus, it is not very practical to flip the actual vector page, so we had to come up with another solution.
Combined with the other three major reasons, which we will get to below, we chose to display an extremely low resolution raster (jpeg) version of the page while the page turn is happening and display a vector, clearText version while the page is standing or being zoomed in upon.
Very few publications out there, even today, use vector files for their publication pages, theoretically, for this very reason. Of those that do, some do not flip pages. This avoids the problem all together; however, ingage Publication was developed to mimic the look and feel of a real magazine, catalog, newsletter, book, etc. Eliminating the page turn feature seems counter to that end.
Load Time
Managing load time has been a balancing act that web content producers have had to perform since it was possible to post graphic data to the Internet. One would assume now that connection speeds and processing ability have increased so dramatically, we wouldn’t really need to make these considerations. This may be true, except that along with increased performance, comes increased expectation and increased richness in content. It seems as though there will always be some new technology out there that will push the boundaries of bandwidth and processing, so the struggle continues.
When we developed the current version of ingage Publication, we needed to decide how to distribute load time. It is a given the data must be transferred at some point. The question simply is: what is acceptable to the end user? Should the whole publication be preloaded into cache, so the user sees only one load screen, at the beginning of the session? Our research and internal debates led us to the conclusion that this option left the door open for too many users, especially on slower connections or slower computers, to abandon viewing the publication because of prolonged load time. We decided that the best route to take was to only preload the minimum amount of data required to view something on the screen and leave the loading of the high-resolution pages to be done on a page by page basis, as the user sees fit.
This technique allows even the publication with very high page counts to load extremely fast and allows the user to quickly begin flipping pages and using the publication as they would a non-digital, hard copy.
This ties directly to usability.
Usability
ingage Publication is used by many of our clients to spice up their magazines, catalogs, brochures and other print materials. If you think about the last time you read a magazine, or flipped through a product catalog, it’s doubtful that began reading at the front cover and read straight through all the pages in sequence. Most likely you either flipped through the magazine or catalog, looking for something that would catch your eye, or perhaps you headed to the table of contents for guidance. It’s no surprise that we have noticed similar patterns with ingage Publication users. Often users will flip through, looking for a specific article or item. Having the low resolution placeholder -the blurry page- available provides the user feedback as to what will be on the page once it finishes loading, which may be quickly or slowly depending on his or her connection speed. This type of feedback is impossible to achieve when the page is blank.
Consider a scenario where a user has begun reading an ingage Publication then is called away in the middle of an article and must close the publication. Sometime later he comes back to his magazine, not knowing exactly which page he stopped reading. As he flips through the publication he vaguely recalls passing a full-page advertisement for a car and knows that he left off on a page containing mostly text. Since ingage Publication uses low resolution pages in place while the high resolution pages are loading, the user can flip through as many pages as he would like, quickly, and gauge whether he is on the page which he left off without having to wait for the high resolution pages to load for all the previous pages. Depending on the length (in pages) of the magazine or catalog, and how deeply into the content the user is, the load time savings can be substantial, even on a high speed connection. Since this user was approaching his use of ingage Publication as he would a traditional paper publication, it was instinctual just to flip through the pages in search of his place in the content.
Performance
There is at least one publication out there that indeed uses vector pages and performs page flipping without using low-resolution files. They achieve this by creating a new BitmapData object, in Flash, using the vector page once it loads, while zooming, displaying the newly created bitmap at the 100% size and storing it in memory for later use. When the page flips, the BitmapData object is flipped to the next page, thus avoiding the vector-rotation issue. The problem with this scheme is two-fold. One, the BitmapData object cannot be made until the vector page has loaded and is rendered, this means that flipping the page before it is loaded causes a blank page to be flipped. Secondly, and most importantly, the BitmapData object used to flip each of the pages must be stored in RAM, ready to be displayed at any time after its creation. Essentially, a bitmap image the size of the page is stored in RAM for each page in the publication the user has visited and allowed to load completely. This may not be a problem for publications with smaller page counts, but for many of our ingage Publication clients, it is not uncommon to have 300 or more pages per publication. Storing that quantity of data in RAM could get painful, especially for users on older computers, or multi-tasking users with several programs running at the same time.
One of the considerations we made when developing the latest version of ingage Publication, was limiting the RAM footprint left by our software. If you’re on a PC, open Task Manager and look at the Mem Usage stats for a publication. As you read more and more pages of a publication, if the usage continually increases, depending on the length of the publication, this could cause performance problems to arise for some users. ingage Publication avoids that possibility by page-flipping low-resolution raster files, and using only the RAM it currently needs and releasing the memory when it is no longer required.
Turning your digital photos into a fun and interactive, page-turning photo album can be quick and easy using ingage Publication Basic and Microsoft PowerPoint.
Microsoft PowerPoint allows you to quickly and creatively design photo album layouts without high-end graphics editing software like Photoshop. Follow the simple steps below and you’ll be enjoying your digital photos in a whole new way.
First, gather up a bunch of digital photos. You’ll need to have Microsoft PowerPoint installed on you computer, and you’ll need to have some knowledge of how to lay out slides using PowerPoint. I used PowerPoint 2003 (on a PC) for the demo, but any version of PowerPoint should do.
I gathered up some stock photos and made a quick example, which you can view here: http://www.ingagepublication.com/samples/photoalbum/publication.html
Open PowerPoint and start a new presentation. Choose a template or color scheme if you like.
Here is the important step:
Go to File > Page Setup…
You will see a window similar to the one shown below:
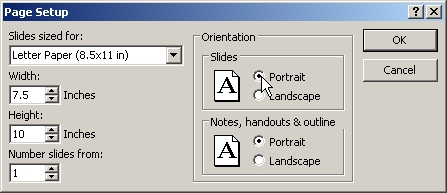
Choose Letter Paper and Portrait
Under “Slides sized for:” choose “Letter Paper (8.5×11 in)” from the drop-down menu.
Next choose “Portrait” in the “Slides” Orientation area on the left.
Click OK
This will change the layout of your PowerPoint Presentation to look more like a standard book or magazine page. You could leave out this step if you are going for a non-standard, landscape style album.
Now you get to do the fun part. Lay out your photo album any way you like. Use your favorite fonts to add captions to your photos; use some clip art, or some word art to add some custom touches. Remember, you can adjust the size of an image by clicking it and dragging the handles on the sides or corners. Right-click an image (on PC) and select “Show Picture Toolbar” to have access to cropping, brightness and rotation tools.
Here are some things to consider:
Each new slide is a new page. Remember that the first page will be the cover of your album. Each page thereafter will alternate between the left and right pages of your album.
Really important step:
Once you are finished laying everything out (don’t forget to save your PowerPoint file, in case you need to edit something later), go to File > Save as…
Choose “JPEG File Interchange Format (*.jpg)”

Choose JPEG File Interchange Format (*.jpg) from the
Click “Save”
When prompted, choose “Every Slide”

Choose Every Slide when prompted.
This will save each of your PowerPoint slides as a separate jpeg file, to be used for conversion to ingage Publication Basic.
Now you can visit http://www.ingagepublication.com/basic to get all the details on ingage Publication Basic, then visit https://basic.ingagepublication.com, register for a free account, convert your photo album using your jpeg pages and see a free proof of your publication before you checkout.
